6 Easy Steps for Creating Pro Quality Facebook and Instagram Ads Oct112021
- Does the thought of running Facebook and Instagram ads intimidate you?
- Does the process seem way too complicated?
- Are you unsure of how to start?
People use a variety of platforms to prepare, create and publish their Facebook and Instagram ads - some offer ease-of-use, while others make the process cumbersome and time consuming.
- We’re a big fan of using automated email platforms to create social media ads.
- Publishing social ads from within an automated email platform allows you to keep the conversation going with email marketing that engages contacts at the moment they connect with your business.
- We’ll be using the Constant Contact automated email platform to illustrate how simple it is to create professional quality ads for Facebook and Instagram in just six steps.
- If you’re using a different automated email platform, compare the steps below and see if your platform offers the same ease-of-use along with professional results. If not, you may want to learn about the Constant Contact 30 day free trial.
Did You Know?
A huge advantage of creating social media ads within an automated email platform is to encourage social media followers to subscribe to your email list. More subscribers equal a larger audience, and a broader Brand reach.
Info Bits
Plan your ad content and have your images ready. Prepare ads a few days before you want to publish them. Facebook reviews submitted ads to ensure ad policy compliance.
A Canva account can be connected to, and integrated with Constant Contact to upload images.
How a Lead ad differs from a Click ad:
- Lead ads allow you to collect a visitor’s email address and any other information you want from a set of fields (like name, address, phone number, etc.) without the user having to leave Facebook.
- Click ads take people off of Facebook, and direct them to a URL of your choice, usually your website, or online store for purchasing an item. Both Lead and Click ads can be run at the same time.
Six Steps to Creating a Facebook or Instagram Ad
in Constant Contact Automated Email
- Create Your Ad
- Select Your Social Pages
- Design Your Ad
- Select Your Audience
- Set Your Budget and Schedule
- Publish Your Ad
1. Create Your Ad
If you have multiple Facebook accounts, connect them before you create your ad. Then you’ll select the account you want to advertise on.
Make sure you have everything you need to get started, including a Facebook Page for your business or organization, and a Facebook Ad Manager account with your payment method connected.
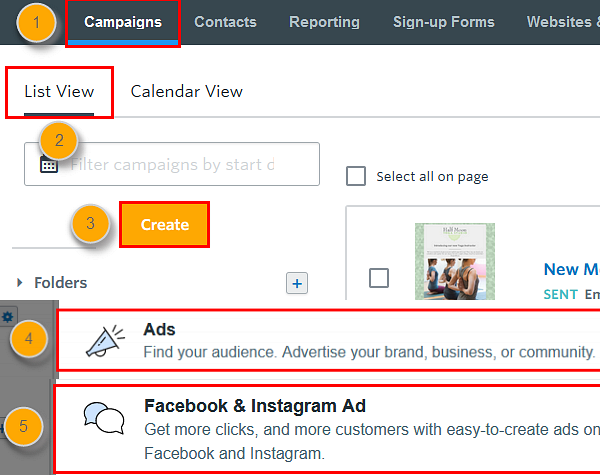
- Click Campaigns.
- Click List View.
- Click Create.
- Select Ads.
- Select Facebook and Instagram Ad.
- In the Facebook Account section, click Connect and sign into your Facebook account.
(If you have multiple Facebook accounts, you must be logged into the account with the Facebook Page you want to connect to your ad.)
- Sign into your Facebook account to sync your Facebook Page and allow Constant Contact permission to integrate with your account to create ads. This doesn't give Constant Contact permission to access any of your personal account information.
- (Optional) The Facebook Ad Account linked to your Facebook Page is automatically selected, but if you have more than one ad account associated, you can select one from the drop-down menu.
- (Optional) Click Edit Payment Settings to add a payment method to your Facebook Ad account. A payment method is required before the ad can be placed.
- Give your ad a name that you can easily recognize in your account later. The name is never seen by your customers or supporters.
- Click Save.
2. Select Your Social Pages
You can choose to share your ad on Facebook or on Facebook and Instagram.
Click Edit next to ‘Select Social Pages.’
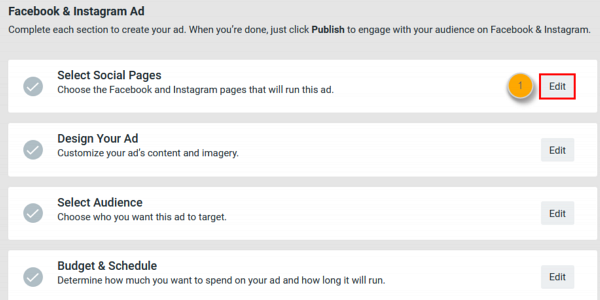
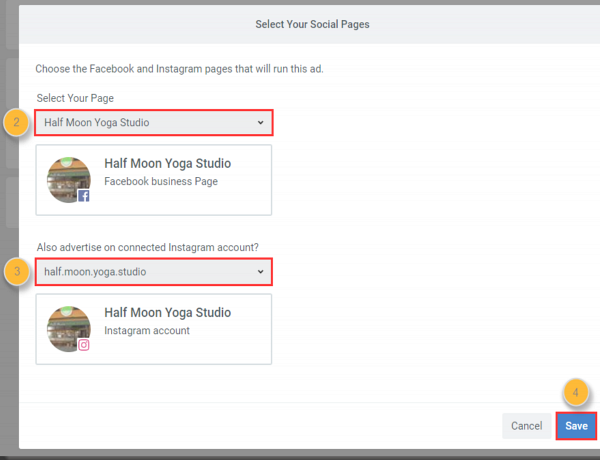
Select your Facebook Page.
If you:
- Have an Instagram account - Make sure it's connected to your Facebook Page, and then select it from the drop-down menu.
- Don't have an Instagram account - Select ‘Advertise to Instagram using my Facebook page info.’ Facebook creates a behind-the-scenes Instagram profile for advertising purposes only, and you can use it for all future ads that you create. If you want to later create an official Instagram account for your organization, you can do it at anytime without affecting your existing ad.
- Don't want to post on Instagram - Select ‘Don't post this ad on Instagram’ from the drop-down menu.
- Click Save.
3. Design Your Ad
Be aware: Certain industries like, non-profits and real estate, have special restrictions under Facebook's Special Ad Categories for ads involving social issues, politics, credit, employment, or housing opportunities.
Click Edit next to ‘Design Your Ad.’
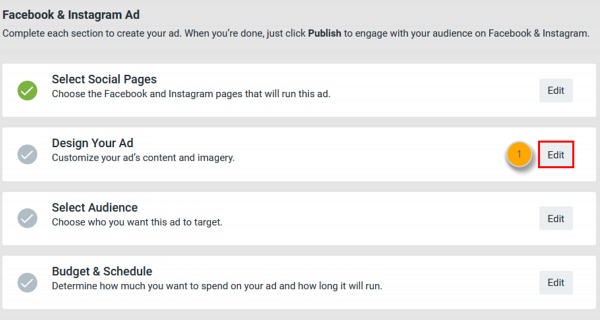
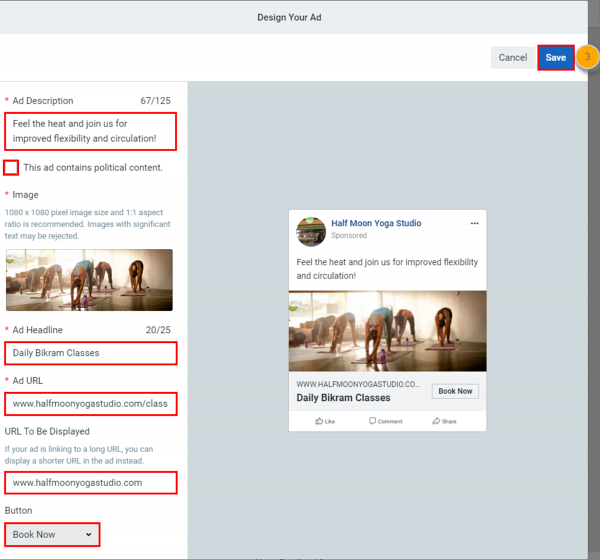
Using the ad layout as a guide, fill in your ad content.
- Ad Description:
This appears as the ‘post text’ at the top of the ad.
- Political Content:
If ad contains political content, Facebook requires it be labeled, so check the box. Facebook Ad compliance for Social issues, Elections or Politics.
- Ad Image:
Click the + button to choose an existing image or upload a new image.
- Ad Headline:
This is the text that sits next to your call-to-action button.
- Ad URL:
This is the website or URL where you want to drive your ad traffic to.
- URL To Be Displayed: This is an aesthetic URL only.
- Button:
This is the main call-to-action. Select the button text from the drop-down menu. Having a button is optional and if you don't include one, your ad is still clickable and directs users to your Ad URL.
- Click Save.
Example ad layout:
4. Select Your Audience
Click Edit next to ‘Select Audience’.
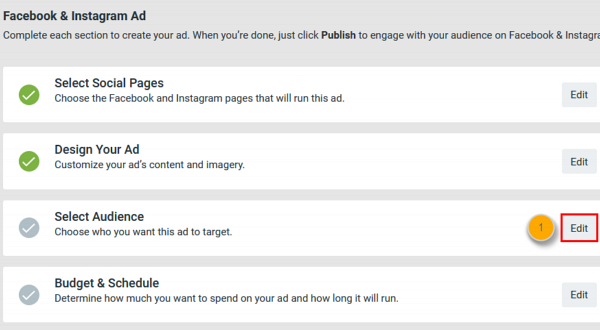
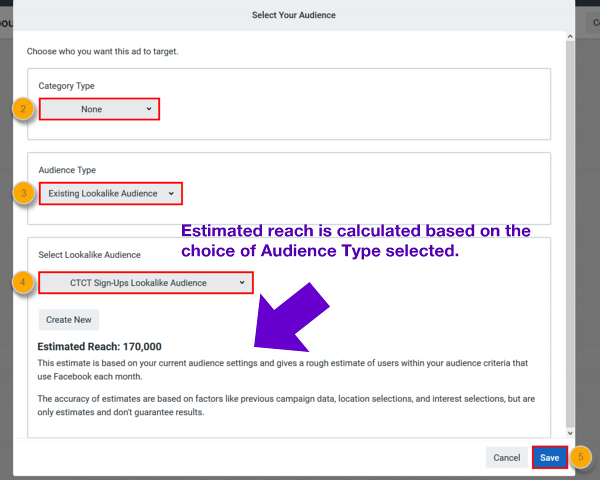
Select a Category Type for your ad.
If you select the ‘None’ option and Facebook reviews your ad and determines that it is a credit, employment, or housing ad, they can decline to publish your ad.
Select an Audience Type:
- Lookalike Audience:
To target new customers and supporters using a Facebook Lookalike Audience.
- New Custom Audience:
To target your ad by location or interests.
Lookalike Audience example:
New Custom Audience example:
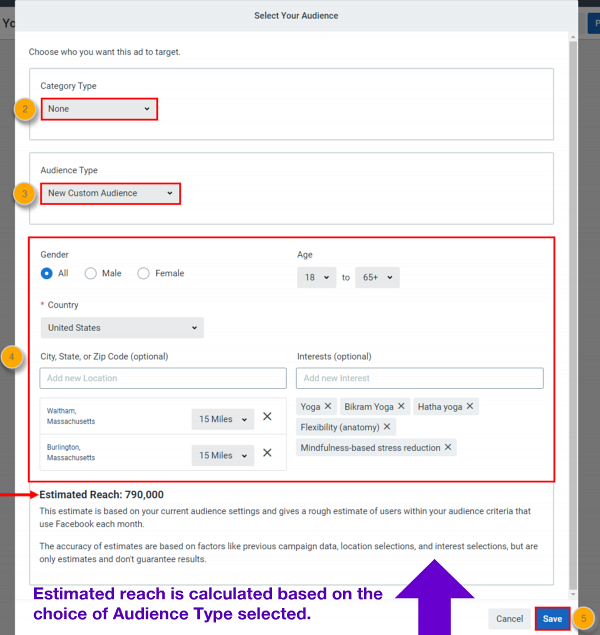
When finished, Click Save.
5. Set Budget and Schedule
Ad billing is processed through the Facebook Ad Account that’s linked to your ad. Be sure you've updated your payment information in the Facebook Ads Manager, your ad won't publish if it’s not connected.
Click Edit next to ‘Budget & Schedule.
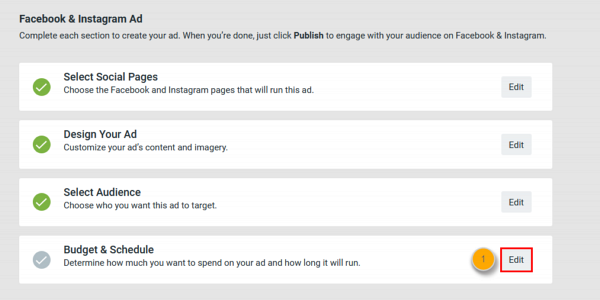
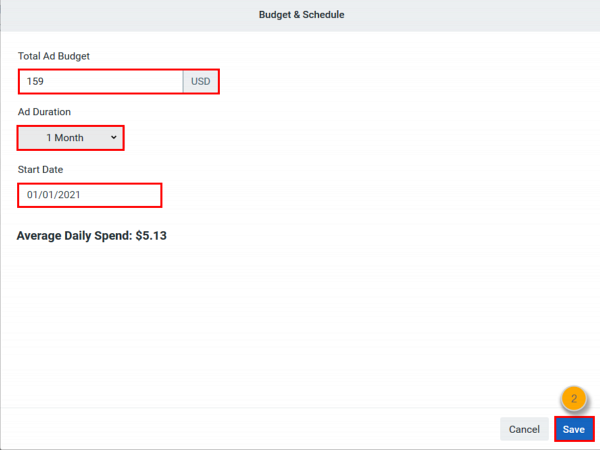
Enter your total ad budget, duration, and start date, then click Save.
How Facebook charges for ads.
Budget and schedule example:
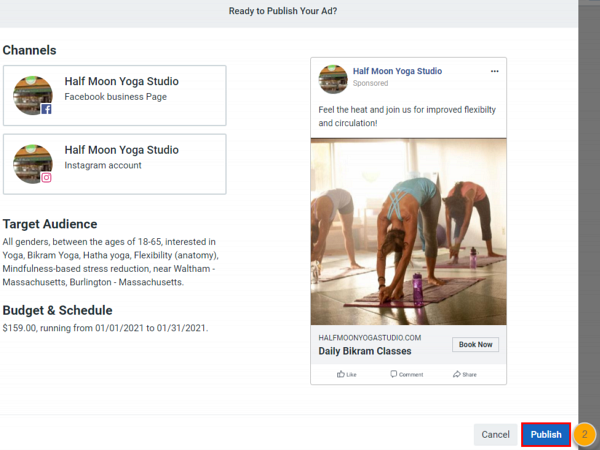
6. Publish Your Ad
Click Publish.
Keep in mind that Publishing your ad doesn't make it go live on Facebook and Instagram immediately. The ad will travel first through Facebook's ad review process to make sure it meets their content policy.
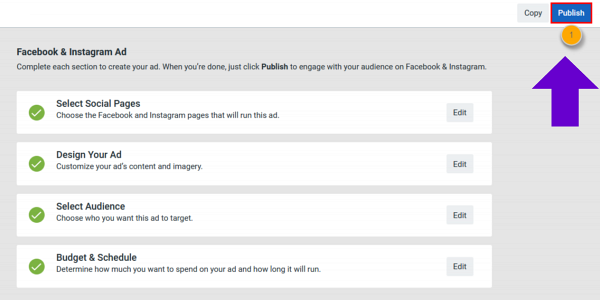
Review your ad details.
When you’re ready to commit, Click Publish to confirm:
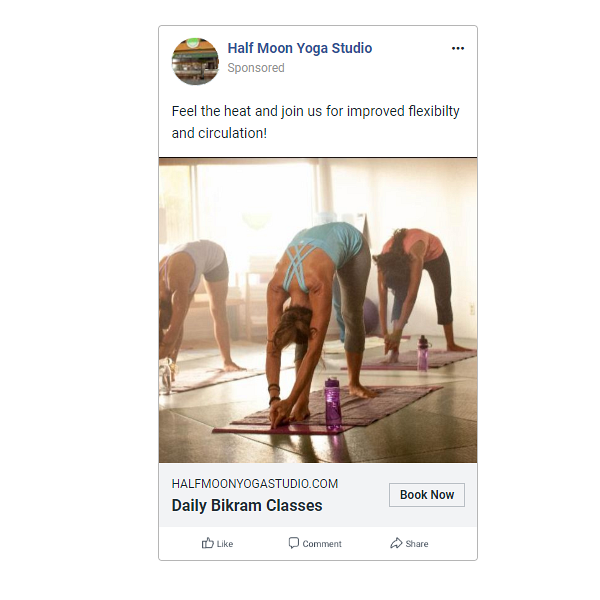
You’ve just created a professional quality social media ad!
Example below:
Make Your Work Life Easier
Within the Constant Contact dashboard you can create and publish Facebook and Instagram ads, and track results.
You can also post regularly to Facebook, Instagram, Twitter and LinkedIn to stay engaged with your audience - all from one dashboard.
Keep your existing automated email account, or start a new path to less work with more results.
Consider giving Constant Contact a try.
Helpful resources:
Video tutorial: Create a Facebook and Instagram Ad.
How to Set Up your Facebook Page to integrate with email marketing.
How to Edit an Active Facebook and Instagram Ad.
How to Pause and Resume an Active Facebook and Instagram Ad or Lead Ad.
How to Unpublish an Active Facebook and Instagram Ad or Lead Ad.
View the Results of a Facebook and Instagram Ad.
How to Create a Lead Ad for Facebook and Instagram.
How to Create a Social Post and schedule it to publish on social media.
Return


